Well tax season came and went, we must have been good kids because the tax fairy left us with some pretty nice new (well new to us) equipment.
I have been wanting to purchase a lathe for quite some time but it has never worked out, a few weeks ago I was about to drive down to Southern Utah to pick up a lathe but things kept falling through and hope seemed to be diminishing. Luckily a few days later one popped up on ebay that peaked my interest, a 56" Sheldon lathe with an 11" swing. Sheldon's are a heavier bench lathe, with our model made sometime between the 30's and 50's, these were built to be used on aircraft carriers and battle ships during WWII(pretty neat that something over 60 years old can be used to this day, quality outlasts time). I purchased it from Hart's Hot Rods in Ventura, CA who were very helpful and great to deal with!
HVC Cycle had a great deal on the MZB electronic ignition for the RD, so I swooped it up, no more points for me.
We did a bit of a re-organization of our shop. Badly needing a better welding table we made one out of 2 pieces of .25" steel plate that we had, welding the center to make it very large and very useful.
Our slip roller was begging for a stand, so we scrapped one together, much improved.
Still need to clean the rust and grime off the welding table.
Our new work desk, with 2 motors hungry for their fresh cranks.
New pistons for the RD, these are oversized to 65.25, as my bores had some err... scratches.
Tail section on the RD, weve been using silicon bronze filler which produces nice fat welds with a great yellow tint.
Silicon bronze is not quite as strong as ER70 or stainless filler but should handle vibration well, and it looks pretty sweet.
The lathe has already had lots of use and it will continue for the foreseeable future...
And with a call from the local laser cutter my pipe pieces are ready, talk about excitement!
These are Vanguard Pattern Pipes, Nate designed these for an RD350 and they can be seen at
http://vanguardcycles.wordpress.com/. He shows the process and how tedious these are to make, he has been extremely helpful with all my questions and a pleasure to do business with. If you are looking for pipe plans for a RD350/400 and want some of the best performing, and in my opinion best looking pipes out there... There ya go.
*Also I want to point out that the original plans call for stainless sheet and tubing, I decided at this point to make them out of mild steel, not necessarily for cost, but the skill required when welding thin stainless is very high. I do believe we can do it but for our learning curve, and the risk in ruining them I think the mild steel will work just fine, for now..*
I started rolling the first bends in the header. Pre-bending the pieces is key to a good roll and fit up.
I started one at a time but since the first 7 pieces are identical I decided to work smarter not harder...
After the first 7 there are 15 that have a slight taper, that's 22 pieces per pipe and I haven't even started on the cones...
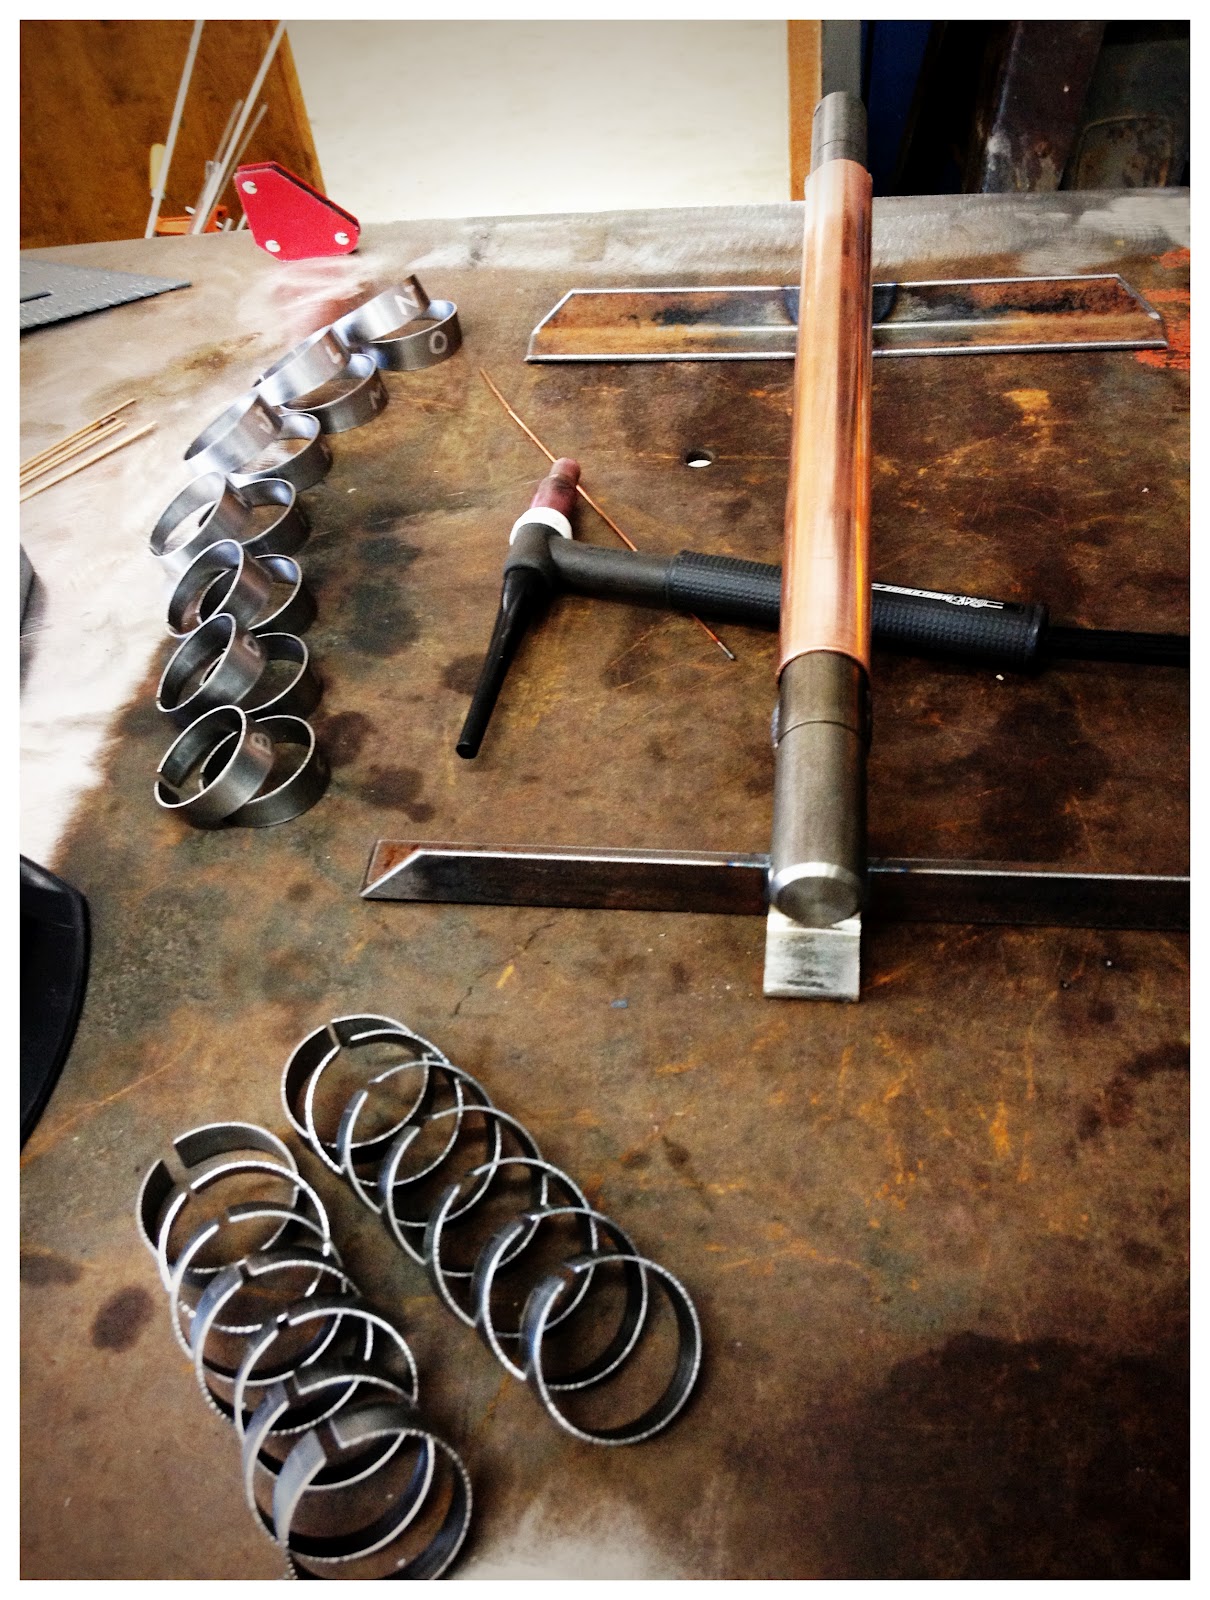
After rolling in the slip roller they need to be trued and tack welded, we came up with a bar just for the job, using some scrap steel and 1" copper pipe it should keep sugaring down and dissipate the heat faster.
Attention to details.
Lots of tedious work, but the payoff and experience will be worth it...
Shop dog/entertainment Kia.
Skye needed to make his exhaust flange bolts fit a little better, thankfully we have a lathe to accomplish the task.
The files call for a 18" long diffuser cone, but after experimenting with rolling something that large we decided to have the laser cutter cut it in two, it made a slight spiral effect which I think looks kind of neat and stands out, but most importantly it made rolling way easier.
I'm pretty sure Skye's hands will never fully recover from the burns, but he seems to almost enjoy the pain. A labor of love I suppose...
I can tell you that the hardest part of these pipes so far is the small baffle cone, it has a 1.125" small end, and being that our slip roller has 2" rolls the math doesn't quite work. But where math failed hard work prevailed(I want to emphasize HARD work, it took 3 people and a couple hours of the brass hammer to accomplish the cone).
Skye has really come a long way from the first day he bought the tig, his hard work and knowledge with a torch is proving to be one of the best assets we have.
Hard to believe this box of metal will become the silencers...
A little present from racetech.
The flanges have been my favorite part of building these pipes, lots of machining and tight tolerances required. I started with a piece of 4" x 6" x .250" cold rolled steel, cut on the band saw to give it a rough shape then used our belt sander to perfect the shape.
Later I'll show how we bored the hole through the plate and finished the flanges.
Stay tuned for more updates, they should be rolling in very quickly now.
As always keep the rubber side down.
Dusten.